Nomad
Scale your Nomad cluster with horizontal cluster autoscaling
As enterprises have accelerated their cloud adoption in the past 2-3 years, horizontal autoscaling has become a critical must-have capability for orchestrators. The dynamic nature of cloud environments allow for compute resources to be easily commissioned and be billed on a usage basis.
Horizontal autoscaling is a feature that enables enterprises to:
Scale up infrastructure on an on-demand basis that is aligned with business SLAs.
Scale down infrastructure to minimize costs based on real demand.
Handle application load spikes or dips in real-time.
Handle cluster-wide excess capacity or shortages in real-time.
Reduce operator overhead and remove hard dependencies on manual intervention.
This tutorial provides a basic demo for running full horizontal application and cluster autoscaling using the Nomad Autoscaler. During this tutorial you will:
Deploy sample infrastructure running a demonstration web application.
Review autoscaler policies to see their behaviors and thresholds.
While monitoring the included dashboard:
Generate traffic and observe the application scale up.
Generate additional traffic and observe the cluster scale out.
Finally, stop the traffic and observe the application scale down and the cluster scale in.
Note
The infrastructure built as part of the demo has billable costs and is not suitable for production use. Please consult the reference architecture for production configuration.
Requirements
In order to build and run the demo, you need the following applications with the listed version or greater locally.
If you are running this demo in a Windows environment it is recommended to use the Windows Subsystem for Linux.
Cloud specific dependencies
There are not specific dependencies for Amazon Web Services.
Fetch the Nomad Autoscaler demos
Download the latest code for the Autoscaler demos from the
GitHub repository. You
can use git to clone the repository or download the ZIP archive.
Clone the hashicorp/nomad-autoscaler-demos repository.
$ git clone https://github.com/hashicorp/nomad-autoscaler-demos
$ cd nomad-autoscaler-demos/cloud
Check out the learn tag. Using this tag ensures that the instructions in
this guide match your local copy of the code.
$ git checkout learn
Change into the cloud specific demonstration directory
The AWS-specific demonstration code is located in the aws directory. Change
there now.
$ cd aws
Create the demo infrastructure
There are specific steps to build the infrastructure depending on which provider you wish to use. Please navigate to the appropriate section below.
Configure AWS credentials
Configure AWS credentials for your environment so that Terraform can authenticate with AWS and create resources.
To do this with IAM user authentication, set your AWS access key ID as an environment variable.
$ export AWS_ACCESS_KEY_ID="<YOUR_AWS_ACCESS_KEY_ID>"
Now set your secret key.
$ export AWS_SECRET_ACCESS_KEY="<YOUR_AWS_SECRET_ACCESS_KEY>"
Tip
If you don't have access to IAM user credentials, use another authentication method described in the AWS provider documentation.
Build demo environment AMI
First, use Packer to build an AMI that is used for launching the Nomad server
and client instances. Replace the placeholders where necessary. Packer will
tag the AMI with the created values, so you can identify your new resources
in the targeted environment. The region flag can be omitted if you are using
the us-east-1 region.
$ cd packer
$ packer build \
    -var 'created_email=<your_email_address>' \
    -var 'created_name=<your_name>' \
    -var 'region=<your_desired_region>' \
    aws-packer.pkr.hcl
Now, navigate to the Terraform AWS environment you will be using to build the infrastructure components.
$ cd ../terraform/control
Build Terraform variables file
In order for Terraform to run correctly you'll need to provide the appropriate
variables within a file named terraform.tfvars. Create your own variables
file by copying the provided terraform.tfvars.sample file.
$ cp terraform.tfvars.sample terraform.tfvars
Update the variables for your environment
region- The region to deploy your infrastructure. This must match the region you deployed your AMI into.availability_zones- A list of specific availability zones eligible to deploy your infrastructure into.ami- The AMI ID created by your Packer run. You will receive it in the output frompacker buildearlier.key_name- The name of the AWS EC2 Key Pair that you want to associate to the instances.owner_name- Added to the created infrastructure as a tag.owner_email- Added to the created infrastructure as a tag.
The most important are ami, region, and key_name
For example, if your Packer run created an AMI ami-03180edfa45c0fce2 in
region us-east-1, and your AWS EC2 Key Pair is named user-us-east-1, your
variables file would look similar to the following:
region             = "us-east-1"
availability_zones = ["us-east-1a"]
ami                = "ami-0bd21458ecf89f85e"
key_name           = "user-us-east-1"
owner_name         = "alovelace"
owner_email        = "alovelace@example.com"
Run Terraform
While in the terraform/control folder, provision your demo infrastructure
by using the Terraform "init, plan, apply" cycle:
$ terraform init
$ terraform plan
$ terraform apply --auto-approve
Once the terraform apply finishes, a number of useful pieces of information
should be output to your console. These include URLs to deployed resources as
well as a Nomad Autoscaler job.
...
Outputs:

ip_addresses = <<EOT

Server IPs:
 * instance hashistack-server-1 - Public: 3.239.96.90, Private: 172.31.74.142


To connect, add your private key and SSH into any client or server with
`ssh ubuntu@PUBLIC_IP`. You can test the integrity of the cluster by running:

  $ consul members
  $ nomad server members
  $ nomad node status

The Nomad UI can be accessed at http://hashistack-nomad-server-1582576471.us-east-1.elb.amazonaws.com:4646/ui
The Consul UI can be accessed at http://hashistack-nomad-server-1582576471.us-east-1.elb.amazonaws.com:8500/ui
Grafana dashboard can be accessed at http://hashistack-nomad-client-1880216998.us-east-1.elb.amazonaws.com:3000/d/AQphTqmMk/demo?orgId=1&refresh=5s
Traefik can be accessed at http://hashistack-nomad-client-1880216998.us-east-1.elb.amazonaws.com:8081
Prometheus can be accessed at http://hashistack-nomad-client-1880216998.us-east-1.elb.amazonaws.com:9090
Webapp can be accessed at http://hashistack-nomad-client-1880216998.us-east-1.elb.amazonaws.com:80

CLI environment variables:
export NOMAD_CLIENT_DNS=http://hashistack-nomad-client-1880216998.us-east-1.elb.amazonaws.com
export NOMAD_ADDR=http://hashistack-nomad-server-1582576471.us-east-1.elb.amazonaws.com:4646


EOT
Copy the export commands underneath the CLI environment variables heading and run these in the shell session you will run the rest of the demo from.
Explore the demo environment
This demo includes several applications that have their own web interface. The
output of the terraform apply command lists their URLs. Visit some of them and
explore. The Terraform process also runs a number of Nomad jobs that provide
metrics, dashboards, a demo application, and routing provided by Traefik.
It may take a few seconds for all the applications to start. If any of the URLs doesn't load the first time, wait a little and retry it.
The application contains a pre-configured scaling policy. You can view it by opening the job file or calling the Nomad API. The application scales based on the average number of active connections, and it targets an average of 10 connections per instance of the web application.
$ curl "${NOMAD_ADDR}/v1/scaling/policies?pretty"
Nomad returns the list of scaling policies currently installed in the cluster.
In this case, you get just the one policy for the webapp job.
[
  {
    "ID": "6b2d3602-70ae-d1fa-bc6a-81f7757a2863",
    "Enabled": true,
    "Type": "horizontal",
    "Target": {
      "Group": "demo",
      "Namespace": "default",
      "Job": "webapp"
    },
    "CreateIndex": 11,
    "ModifyIndex": 11
  }
]
Run the Nomad Autoscaler job
The Nomad Autoscaler job does not run automatically. This gives you the opportunity to look through the jobfile and understand it better before deploying.
Open up the aws_autoscaler.nomad file in a text editor. The most interesting
parts of the aws_autoscaler.nomad file are the template sections. The first
defines the agent config where it configures the prometheus, aws-asg and
target-value plugins.
      template {
        data = <<EOF
nomad {
  address = "http://{{env "attr.unique.network.ip-address" }}:4646"
}

apm "prometheus" {
  driver = "prometheus"
  config = {
    address = "http://{{ range service "prometheus" }}{{ .Address }}:{{ .Port }}{{ end }}"
  }
}

...

target "aws-asg" {
  driver = "aws-asg"
  config = {
    aws_region = "{{ $x := env "attr.platform.aws.placement.availability-zone" }}{{ $length := len $x |subtract 1 }}{{ slice $x 0 $length}}"
  }
}

strategy "target-value" {
  driver = "target-value"
}
EOF

        destination = "${NOMAD_TASK_DIR}/config.hcl"
      }
The second is where it defines the cluster scaling policy and writes this to a local directory for reading.
      template {
        data = <<EOF
scaling "cluster_policy" {
  enabled = true
  min     = 1
  max     = 2

  policy {
    cooldown            = "2m"
    evaluation_interval = "1m"

    check "cpu_allocated_percentage" {
      source = "prometheus"
      query  = "sum(nomad_client_allocated_cpu{node_class=\"hashistack\"}*100/(nomad_client_unallocated_cpu{node_class=\"hashistack\"}+nomad_client_allocated_cpu{node_class=\"hashistack\"}))/count(nomad_client_allocated_cpu{node_class=\"hashistack\"})"

      strategy "target-value" {
        target = 70
      }
    }

...

    check "mem_allocated_percentage" {
      source = "prometheus"
      query  = "sum(nomad_client_allocated_memory{node_class=\"hashistack\"}*100/(nomad_client_unallocated_memory{node_class=\"hashistack\"}+nomad_client_allocated_memory{node_class=\"hashistack\"}))/count(nomad_client_allocated_memory{node_class=\"hashistack\"})"

      strategy "target-value" {
        target = 70
      }
    }

...

    target "aws-asg" {
      dry-run             = "false"
      aws_asg_name        = "hashistack-nomad_client"
      node_class          = "hashistack"
      node_drain_deadline = "5m"
    }
  }
}
EOF

        destination = "${NOMAD_TASK_DIR}/policies/hashistack.hcl"
      }
Once you have an understanding of the autoscaler job and the policies it contains, deploy it to the cluster
using the nomad job run command. If you get an error, verify that the NOMAD_ADDR environment
variable has been properly set according to the preceding Terraform output.
$ nomad job run aws_autoscaler.nomad
If you wish, in another terminal window you can export the NOMAD_ADDR
environment variable and then follow the Nomad Autoscaler logs. Use the
allocation ID output when you ran nomad job run on the autoscaler job.
$ nomad alloc logs -stderr -f <alloc-id>
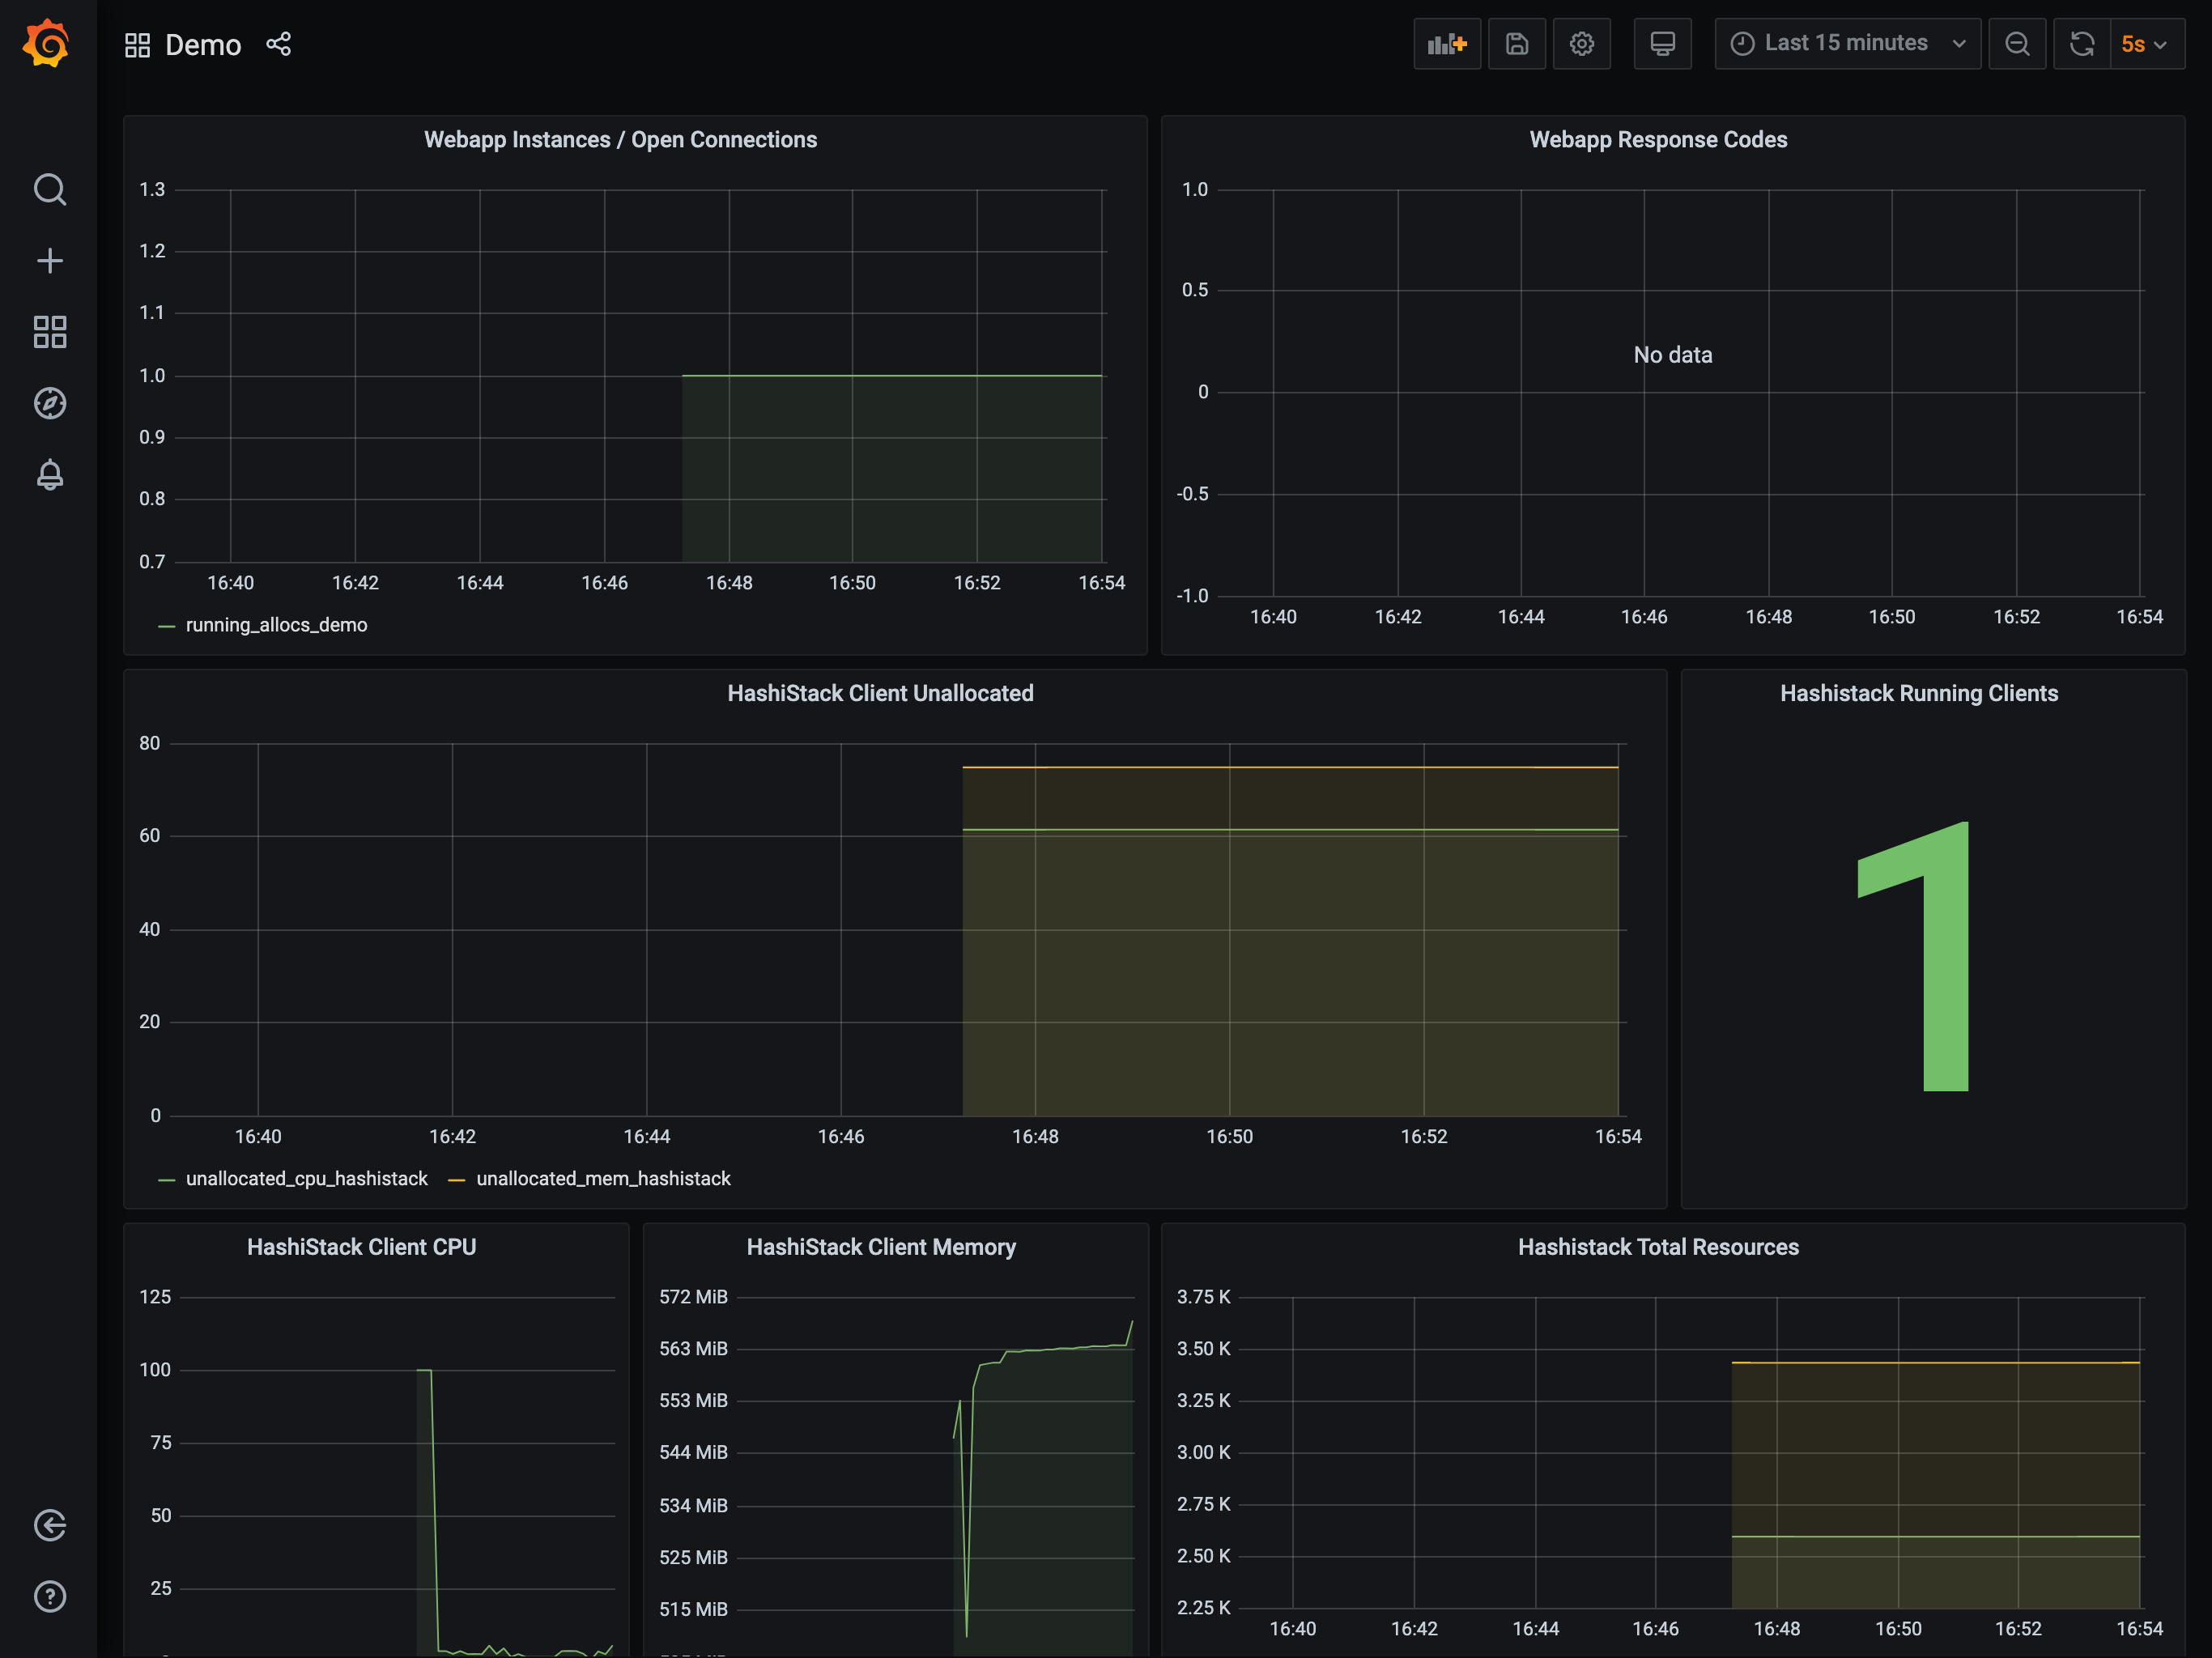
Open the scenario's Grafana dashboard
Retrieve the Grafana link from your Terraform output. Open it in a browser. It might take a minute to fully load if you didn't take some time earlier to look around.
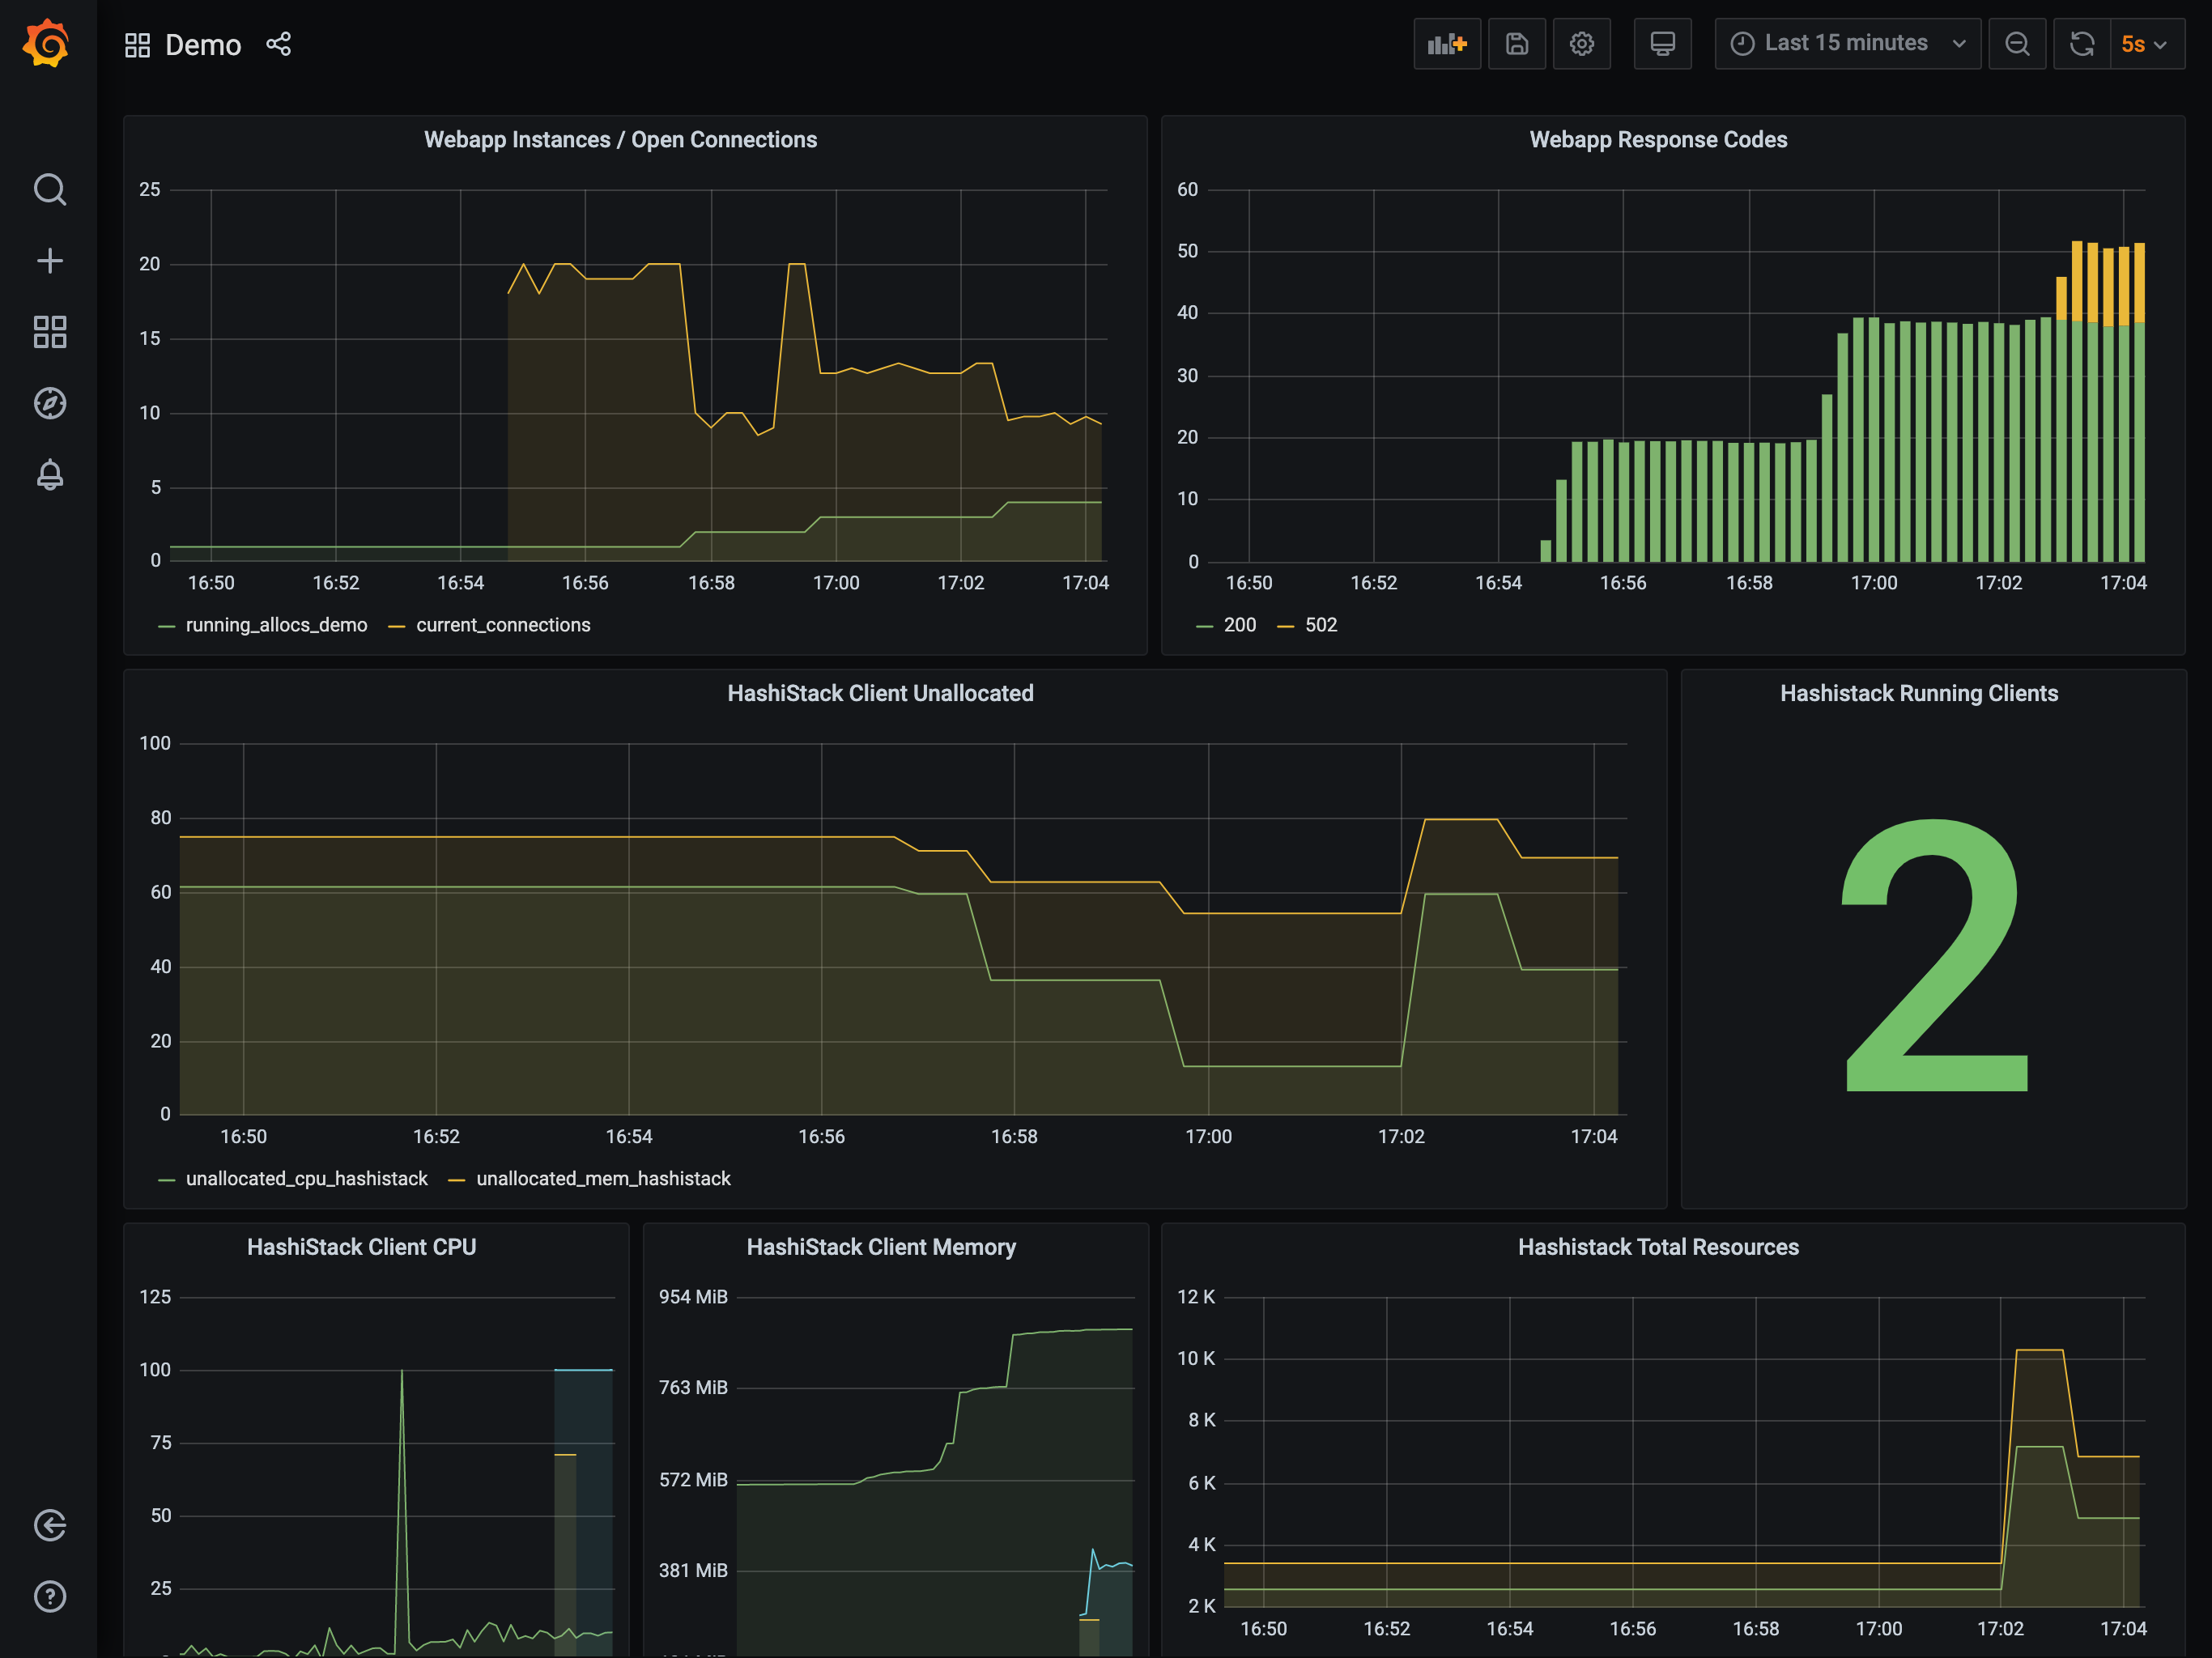
Once loaded, you will receive a dashboard similar to this.
Generate application load
In order to generate some initial load, you will use the hey application. This
will cause the application to scale up slightly.
Run a load generator
$ hey -z 10m -c 20 -q 40 $NOMAD_CLIENT_DNS:80 &
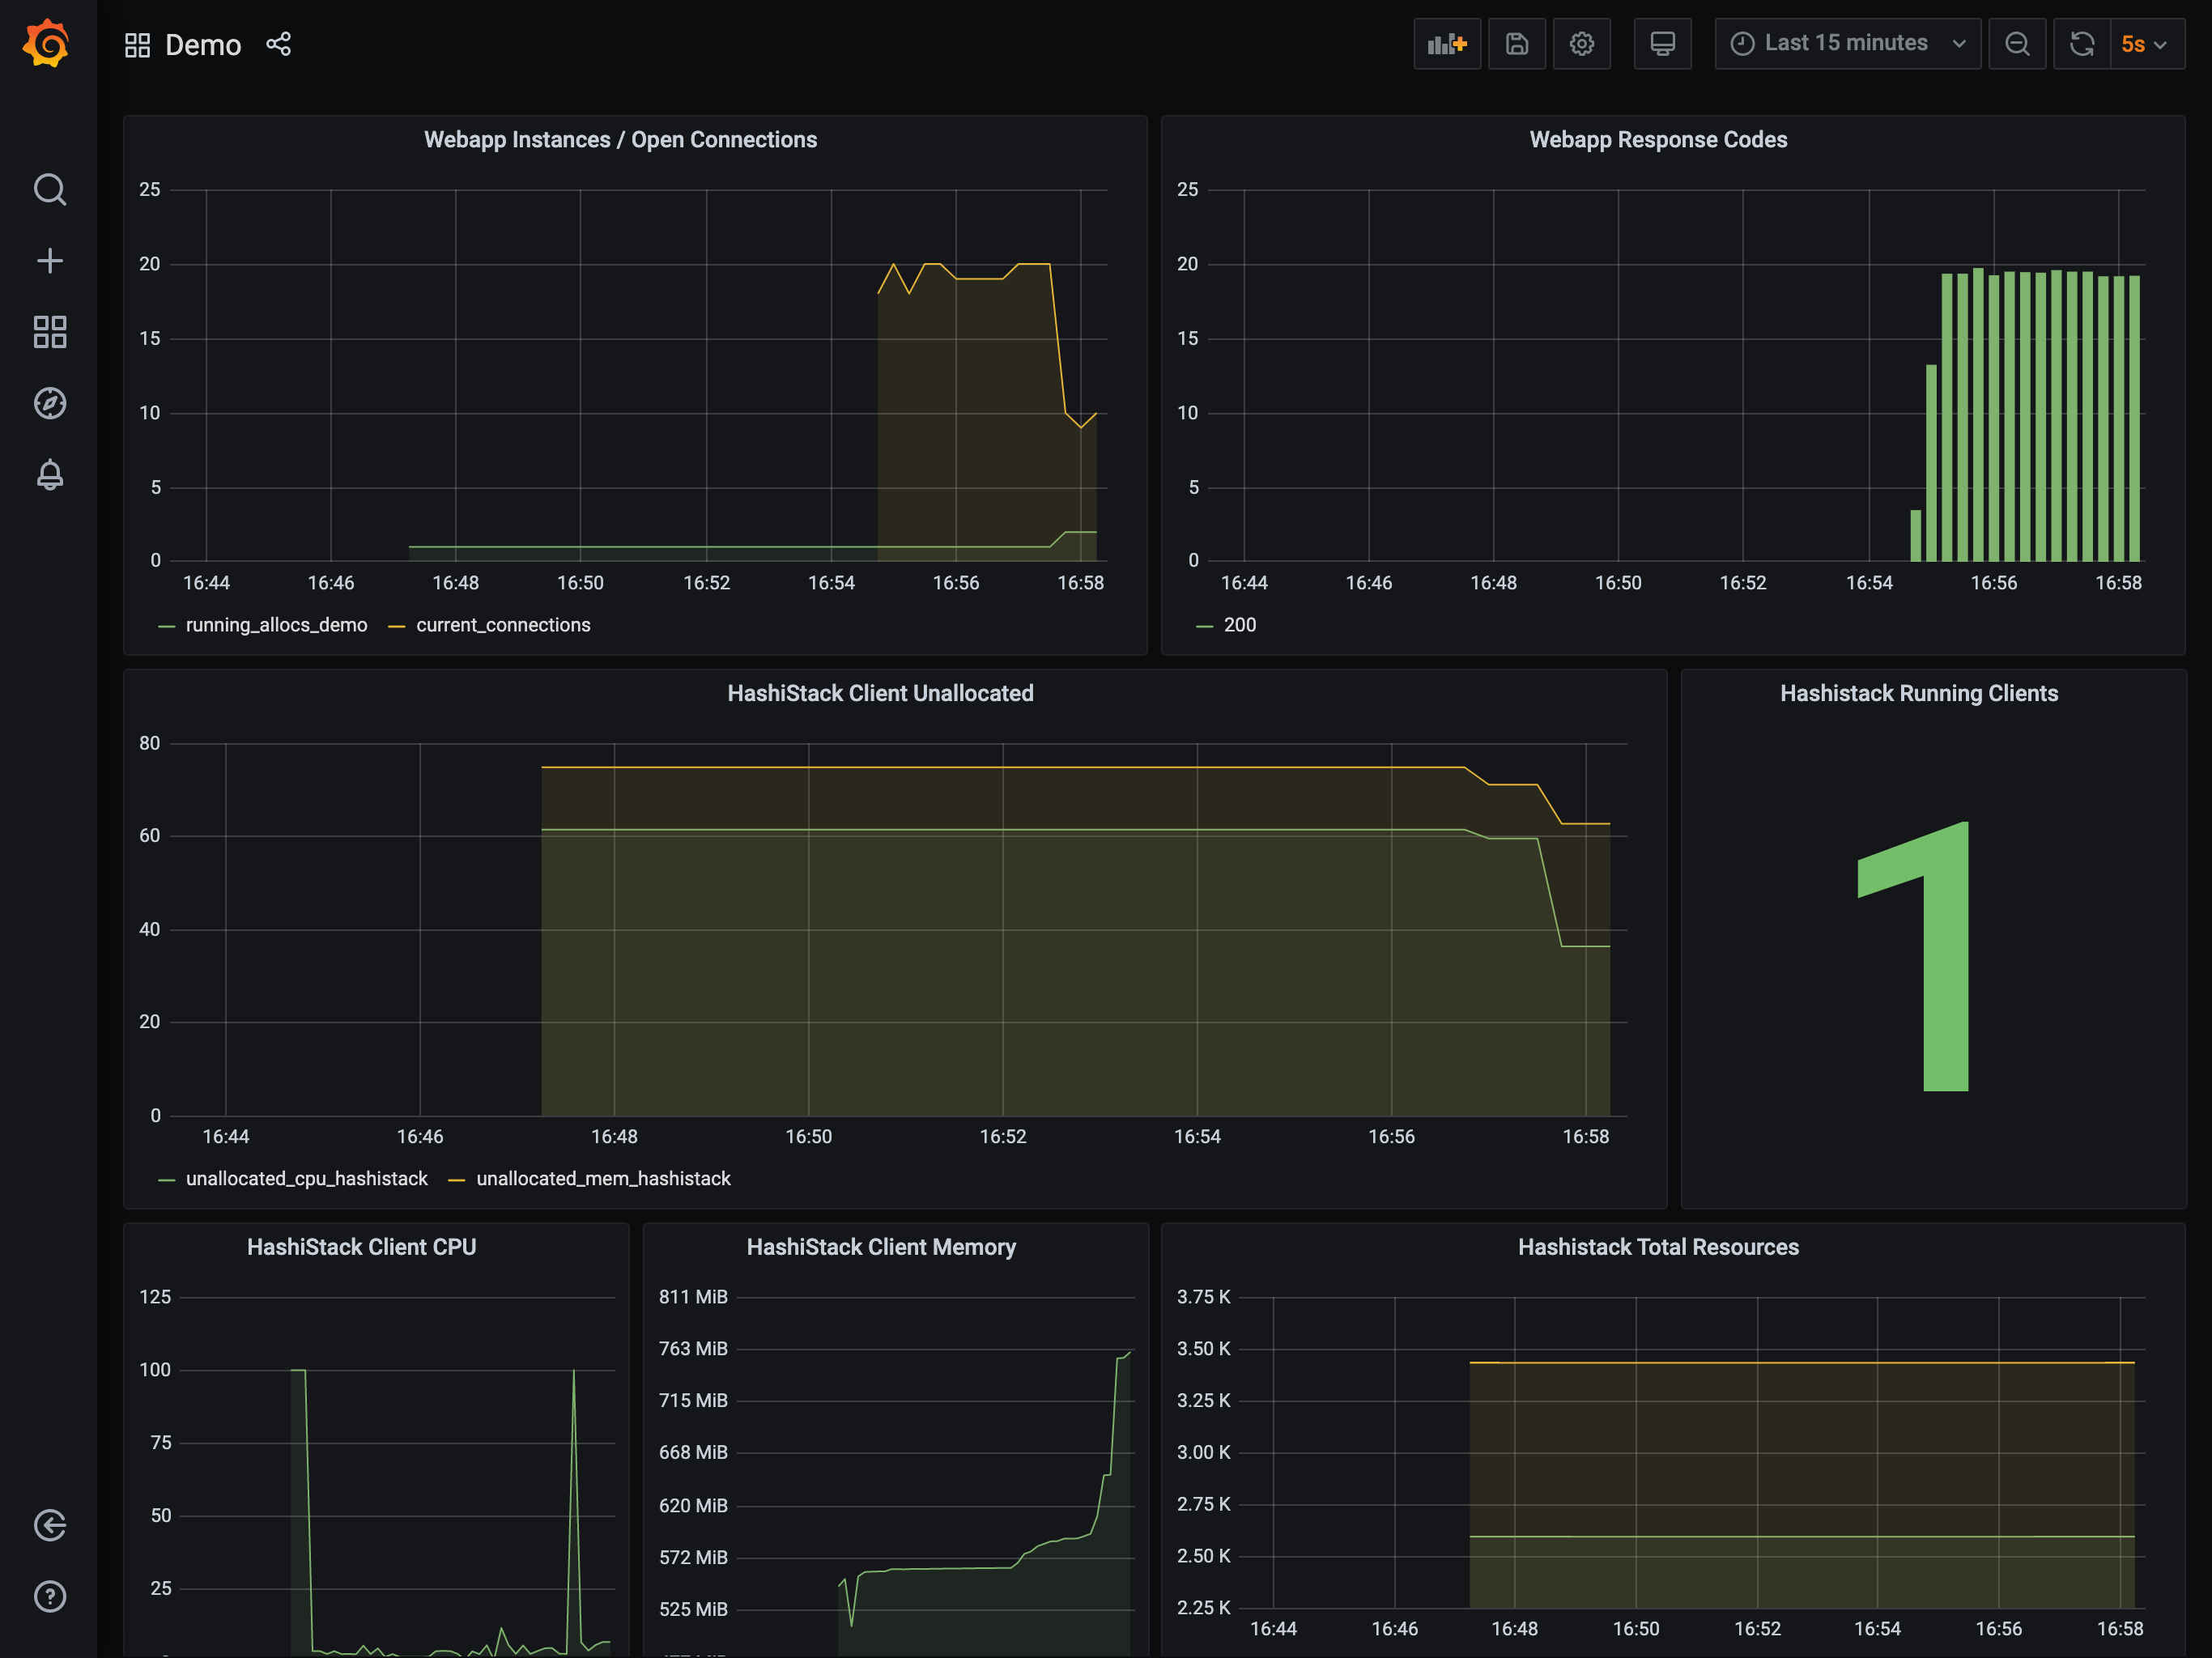
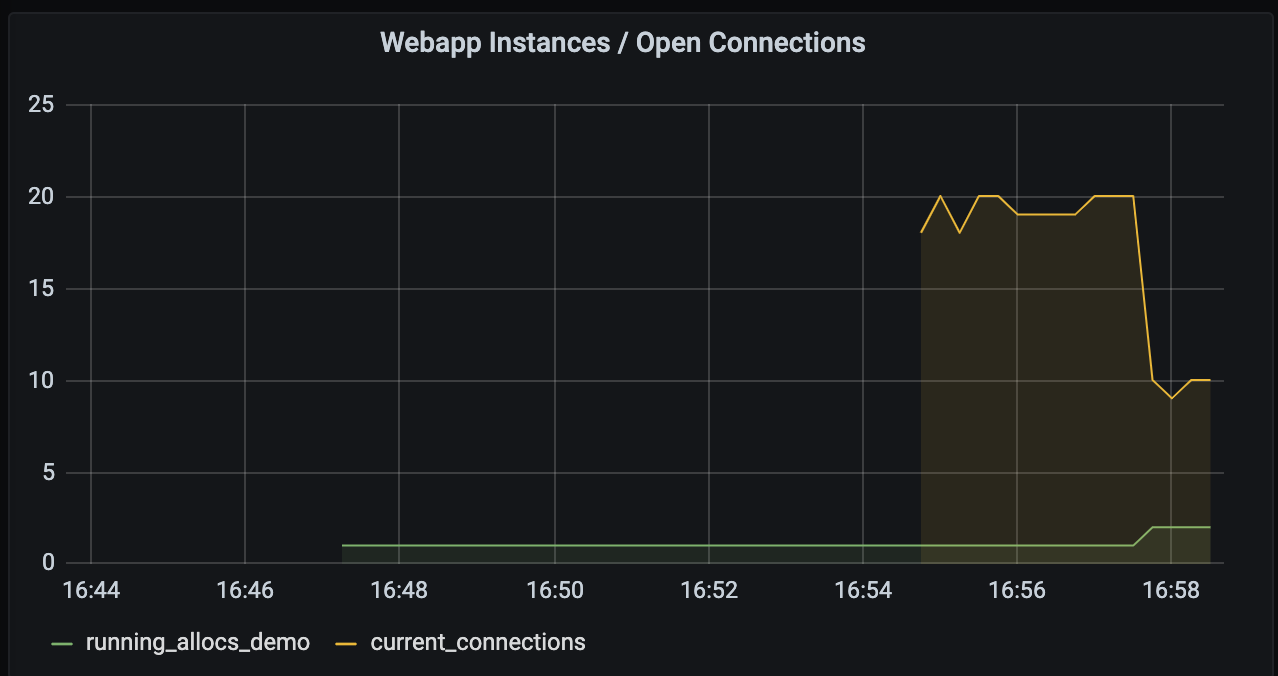
Viewing the autoscaler logs or the Grafana dashboard should show the application
count increase from 1 to 2. Once this scaling has taken place, you can
trigger additional load on the app that causes further scaling.
The application count is the graph in the top left.
Run a second load generator
$ hey -z 10m -c 20 -q 40 $NOMAD_CLIENT_DNS:80 &
This again causes the application to scale, this time from 2 to 4,
which in-turn reduces the available resources on your cluster. The reduction is
such that the Autoscaler will decide a cluster scaling action is required and
trigger the appropriate action.
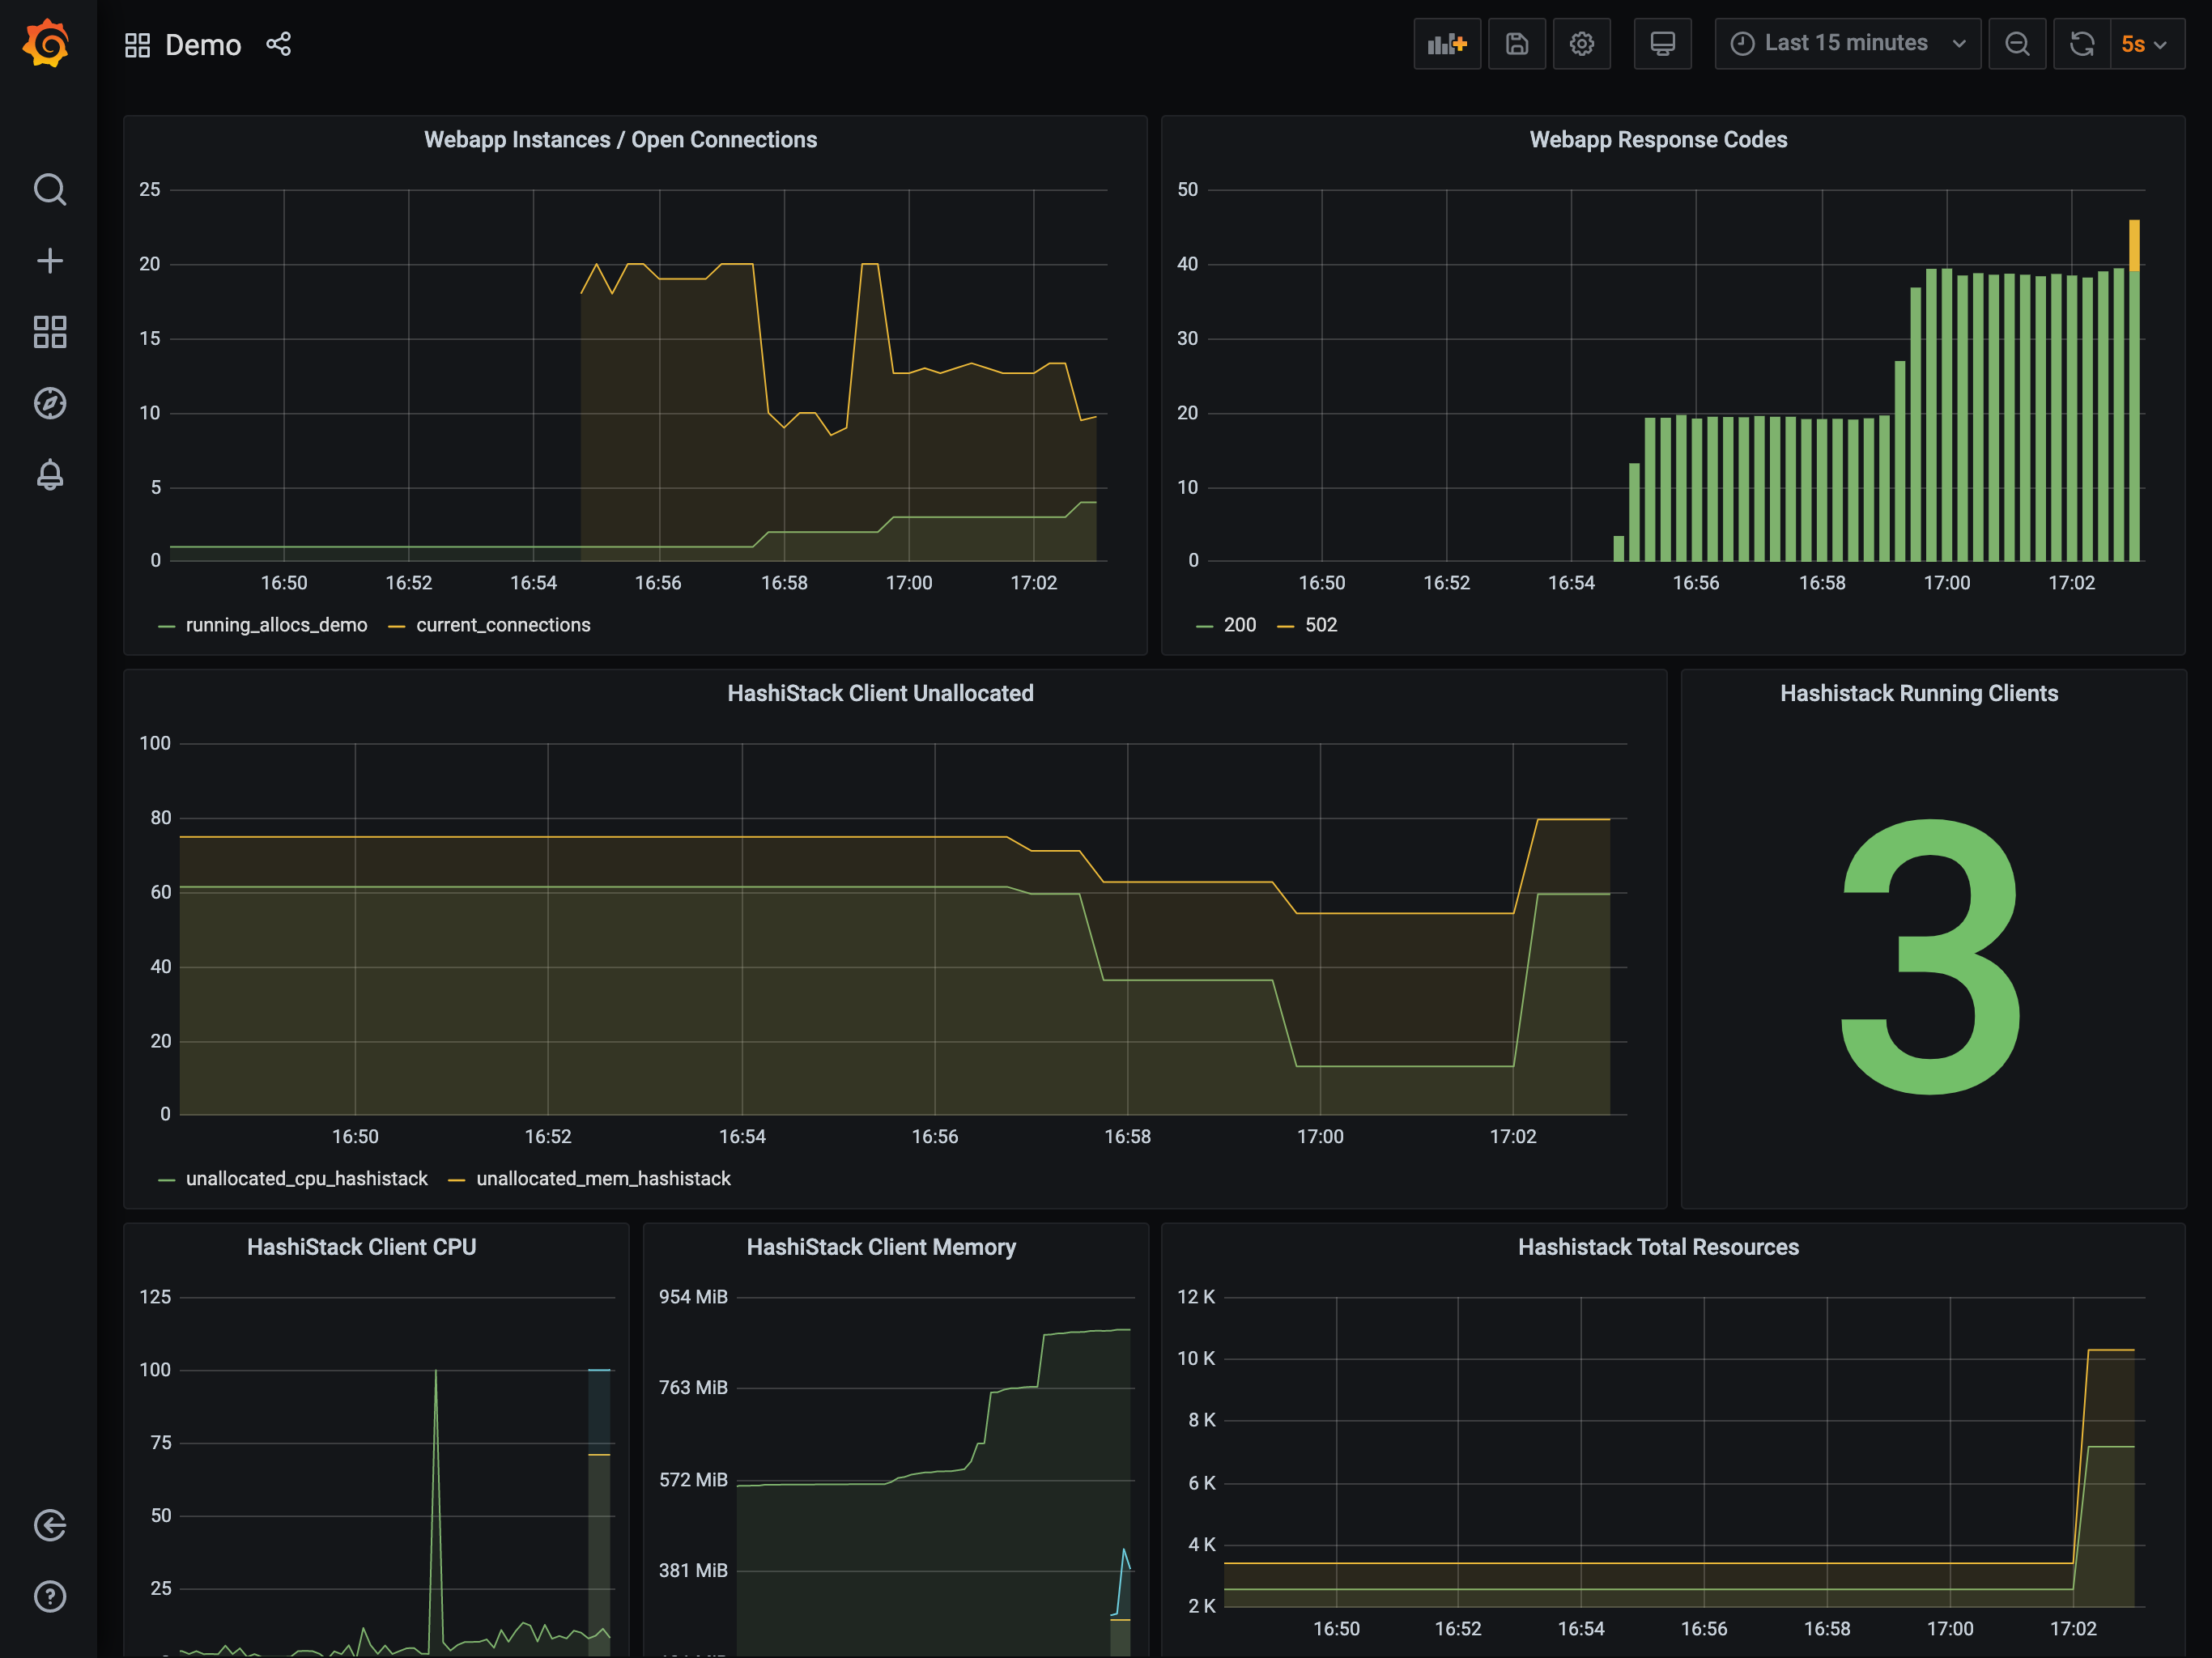
When watching the dashboard, you may see the cluster scale to three clients. This is because many cloud providers will add an additional instance to a scale-up request and then terminate the slowest instance to start.
Once this instance is reaped, you will see the expected two clients.
Remove load on the application
Now, simulate a reduction in load on the application by stopping the
running hey processes using the pkill command.
$ pkill hey
[2]  + 36851 terminated  hey -z 10m -c 20 -q 40 $NOMAD_CLIENT_DNS:80
[1]  + 36827 terminated  hey -z 10m -c 20 -q 40 $NOMAD_CLIENT_DNS:80
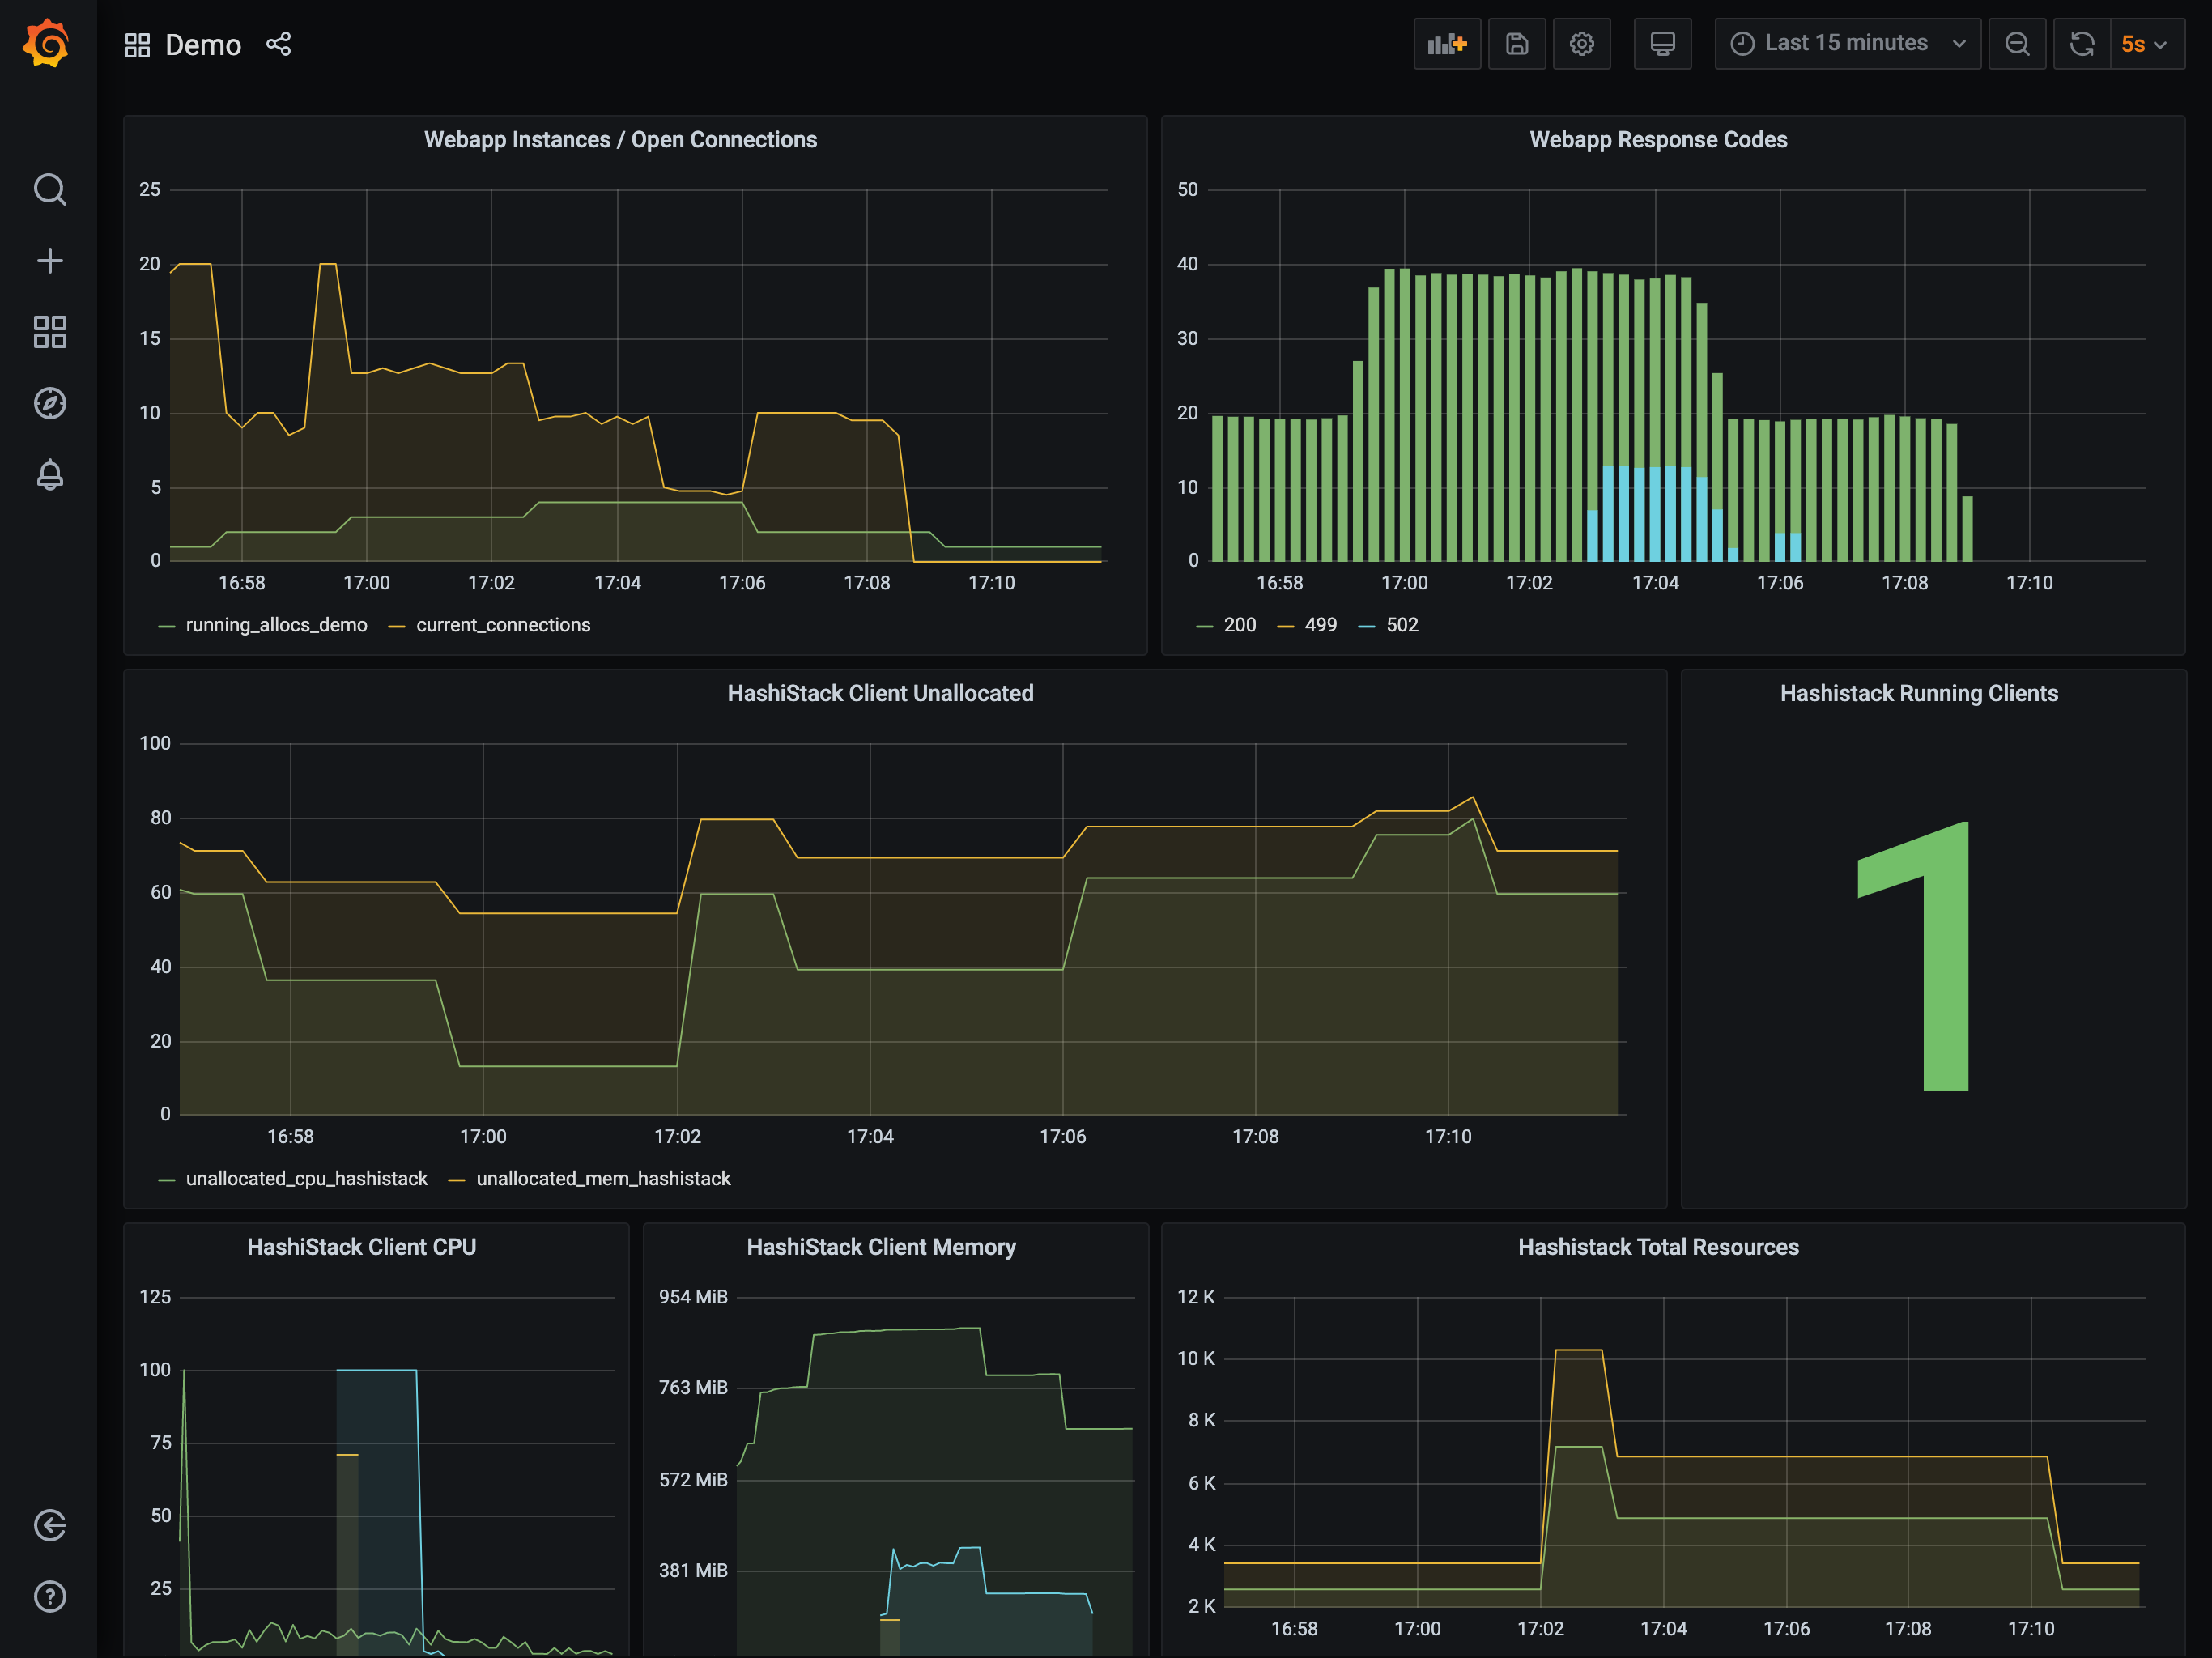
The reduction in load causes the Autoscaler to firstly scale in the
task group from 4 to 1. Once the task group has scaled in a sufficient
amount, the Autoscaler scales in the cluster from 2 to 1. It performs
this work by selecting a node to remove, draining the node of all work, and then
terminating it within the provider.
Destroy the demo infrastructure
Once you are done experimenting with the autoscaler, use the terraform destroy
command to deprovision the demo infrastructure.
It is important to destroy the created infrastructure as soon as you are
finished with the demo to avoid unnecessary charges in your cloud provider
account. To do this, issue the terraform destroy command.
$ terraform destroy --auto-approve
Perform cloud-specific cleanup activities
Deregister the AMI that you created with Packer in the beginning of this demo. You can use the AWS console or the AWS CLI if you have it installed.
This set of commands will extract the AMI ID from your variables file, deregister the image, and delete the backing EBS snapshot.
$ export IMAGE=$(awk '/ami/ {print $3}' terraform.tfvars | tr -d "\"")
$ export REGION=$(awk '/region/ {print $3}' terraform.tfvars | tr -d "\"")
$ export SNAP=$(aws ec2 describe-images --image-id $IMAGE --region $REGION --output json --query 'Images[0].BlockDeviceMappings[0].Ebs.SnapshotId' --no-paginate | tr -d "\"")
$ aws ec2 deregister-image --image-id $IMAGE --region $REGION
$ aws ec2 delete-snapshot --snapshot-id $SNAP --region $REGION
Next steps
Now that you have explored horizontal cluster autoscaling with this demonstration, continue learning about the Nomad Autoscaler.